
This post helps MTG players decide between home-printed proxies and professional printing by explaining the real cost, time, and quality tradeoffs, so you can get playable cards without turning your weekend into a printer support group.
TLDR
Home printing is great when you need a few playtest cards tonight, and you do not care if they feel “real” in hand.
Professional printing is worth it when you want a full deck that’s consistent, readable, and shuffles cleanly without arts-and-crafts aftermath.
The “cheap” part of home printing is usually the paper. The expensive part is ink/toner, wasted prints, cutting, corner rounding, and your time.
Office printers make proxies look rough because they’re optimized for spreadsheets and speed, not rich color images. No, it’s not you.
PrintMTG prints at 1200 dpi, enhances every image for crisp text and clean detail, and corner rounds to original card dimensions. We do not do spot metallics.
If you’ve ever printed a proxy sheet at home and thought, “This is fine, it’s readable,” then sleeved it up and immediately noticed one card feels like a cereal box coupon, this article is for you.
We’re comparing home printer proxies vs professional printing the way you actually experience it: cost, time, quality, and the sneaky stuff that ruins shuffle feel.
Table of contents
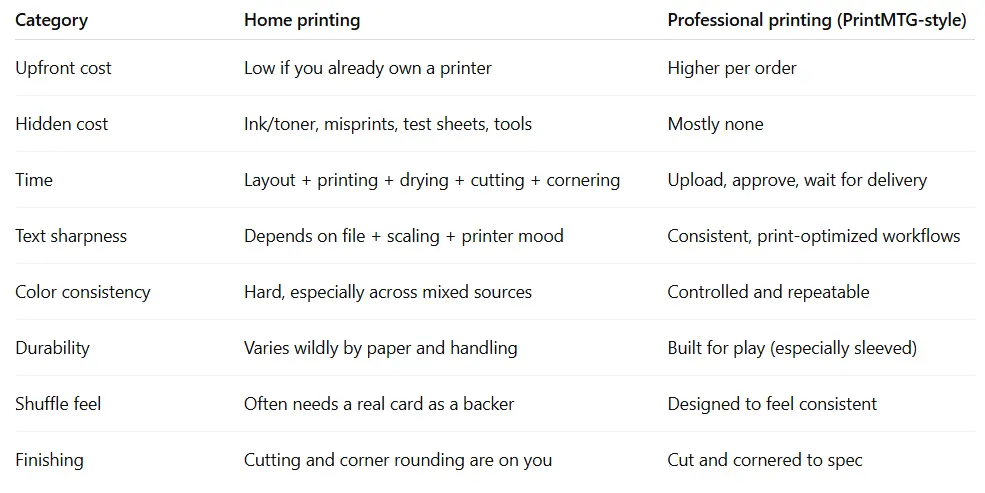
Home printer proxies vs professional printing: the reality check
If you must print at home: settings that avoid the worst results
Why office printers make proxies look bad (and it’s not personal)
FAQs
Home printer proxies vs professional printing: the reality check
The quick decision rule (use this and move on with your life)
Print at home if you need under 20 cards, you need them today, and you’re fine with “good enough in sleeves.”
Print professionally if you want a full deck, you care about consistency, or you do not want to spend your evening learning why “Fit to Page” is a villain.
And yes, this is about proxies. Keep it casual and transparent. Sanctioned events are their own universe with their own physics.
Cost reality check (what you actually pay)
Home printing “cost per card” is a trap because it ignores everything that makes the card playable.
You’re paying for:
Ink or toner (the most expensive liquid known to man, per ounce)
Paper that won’t fold like regret (heavier stock, or photo paper if you’re inkjet)
Test prints (you will do at least one, even if you swear you won’t)
Cutting tools (ruler and scissors is how we get jagged edges and sadness)
Corner rounding (optional until you try shuffling sharp corners for one game)
Professional printing costs more up front, but it includes the parts you normally forget to price: consistent finishing, consistent color, consistent cuts, and not having to redo Sheet #3 because it scaled to 97% for reasons.
Time reality check (the “how long will this take me” part)
Home printing time is not just “hit print.”
It’s:
find or export images
place them into a template
print test page
adjust scaling
print final pages
let ink dry (if inkjet)
cut
corner round
sleeve and realize one card is 1 mm taller than the rest
Professional printing time is:
upload or submit a list
pick options
wait for production + shipping
play Magic instead of crafting
If you’re printing a whole Commander deck at home, you are choosing a hobby inside your hobby. That can be fun. It can also be a mistake.

Quality reality check (what “good” really means in play)
Proxy quality isn’t about perfection. It’s about playability:
Rules text is crisp
Mana costs are instantly readable
Cards are consistent enough in sleeves that your deck doesn’t feel like 100 different objects
Home printing can absolutely be readable. Where it struggles is consistency:
mixed image sources
accidental scaling differences
color shifts across pages
paper thickness variations
corners that do not match real cards
Professional printing wins on consistency. PrintMTG specifically prints at 1200 dpi, enhances every image for crystal clear printing, and corner rounds to the exact dimensions of original cards. That last part sounds picky until you shuffle a deck where half the corners snag.
One more important note: some print shops offer fancy finishes like spot metallics. We don’t do spot metallics right now. If you want shine, foil is the route. Spot effects are cool, but “my deck shuffles cleanly” is cooler.
The legality footnote (short, because it matters)
If you’re playing at home or in a casual pod, proxies are usually fine if everyone’s on board. If the event is sanctioned, assume authentic cards are required and judge-issued proxies are a narrow exception. If you want the longer version, here’s our practical guide: How to Make MTG Proxies.
If you must print at home: settings that avoid the worst results
Let’s make your home printer proxies as painless as possible. The goal is not “museum quality.” The goal is “readable, consistent, and not obviously scaled wrong.”
1) File and layout settings that matter
Print at 100% scale. Disable “Fit to Page,” “Shrink to Printable Area,” and anything that sounds helpful.
Use a consistent template. One template per project, not “this looked close enough.”
Prefer high-resolution images. If your source image is tiny, no setting will save it.
Avoid tiny text edits. Home printing magnifies every typo and every fuzzy edge.
Do a single-card test strip. Print 2–3 cards first, not a full sheet.
2) Printer settings that usually help
These names vary by printer, but the ideas are consistent.
If you’re using an inkjet (often better for color art):
Set Quality to High or Best
Use the correct Paper Type (photo paper settings on plain paper looks awful)
Turn off “Eco” or “Draft”
If available, turn on borderless only if your template is built for it
If you’re using a laser printer (often better for crisp text):
Use the highest quality mode available
Select the correct paper weight setting if your printer supports it
Expect color art to look flatter than you hoped
3) Paper choices (the part that decides whether this feels like a card)
Plain copy paper is fine for a quick test, but it’s not a card.
For playable proxies, you’re usually choosing between:
Heavier cardstock (stiffer, but can look less vibrant depending on coating)
Photo paper (vibrant on inkjet, but can feel slippery and cut differently)
If you want a decent “shuffle feel,” most people end up sleeving and using a real card behind the print.
4) Cutting and corner rounding (do not skip this if you care about play)
Use a paper trimmer if you can. Scissors are chaos.
Keep your cuts consistent. One slightly taller card will announce itself during shuffling like it’s proud of its work.
Corner rounding matters more than people think. Real Magic cards have a consistent corner radius. If your corners are sharper or more rounded, the deck will feel inconsistent fast.
If you’re doing this more than once, you’ve basically reinvented the reason professional finishing exists.
Want home results without home headaches?
That’s literally why PrintMTG exists. If we mess up printing, finishing, cutting, or packing on our side, we fix it. No runaround. Here’s the policy: Quality Guarantee & Reprints.
Why office printers make proxies look bad (and it’s not personal)
Office printers are excellent at what they were designed for: documents. Proxies are not documents. Proxies are dense, color-heavy images with fine detail and lots of dark areas. Office printers see that and quietly panic.
Here’s why office printers so often disappoint:
1) They’re tuned for speed and legibility, not art
Many office printers prioritize:
fast output
crisp black text
low cost per page
That’s great for invoices. It’s not great for card frames, gradients, and detailed illustrations.
2) Laser printers use heat and toner (and that has side effects)
Laser printers fuse toner to paper with heat and pressure. That’s why pages come out warm and sometimes slightly curled. Heavy toner coverage on small “card rectangles” can also look:
flatter in color
slightly gritty in dark areas
less nuanced in gradients

3) Locked-down settings ruin consistency
In offices, you often cannot control:
paper type
quality settings
color profiles
scaling defaults
So you get the classic “why is this slightly smaller than the template” problem. Or the “why did it turn my blacks into dark gray” problem. Or both, because printers are ambitious.
4) Paper is usually the cheapest possible option
Office paper is designed to be cheap and run through machines at volume. It’s not designed to feel like a game piece, and it’s definitely not designed to be corner rounded and shuffled repeatedly.
If an office printer is all you have
Do this and accept that it’s a compromise:
Print in color, highest quality available
Force 100% scale
Use the thickest paper the printer reliably feeds
Sleeve everything, ideally with a real card behind it
Keep it for casual play and testing, not for trying to impress anyone
Office printing is still useful. It’s just not a shortcut to “professional quality.” It’s a shortcut to “I have something playable right now.”
FAQs
Are home-printed proxies allowed in sanctioned MTG events?
No. In sanctioned play, proxies are a judge-issued exception for specific problems during the event. Bring real cards to sanctioned events.
What’s the minimum quality I need for home printed proxies?
Readable rules text, readable mana costs, consistent size, and opaque sleeves if you’re mixing backs. If it’s confusing on board, it’s not done.
Should I use inkjet or laser for proxies at home?
Inkjet often wins on color and art. Laser often wins on crisp text. Either can work, but paper choice and scaling settings matter more than people expect.
Why do my prints look blurry even though my printer says “1200 dpi”?
Because printer dpi is not the same as image resolution. If your source image doesn’t have enough detail at the size you’re printing, it will still look soft.
Can I get “foil effects” at home?
Not really, not in a clean, repeatable way. Foil looks good when it’s made for that purpose. Home hacks tend to look like home hacks.