
TLDR
If you want to know how to make proxy MTG cards, start with the print spec first, not the art.
The biggest quality jumps come from correct card size, bleed, safe zone, sharp source images, and printing at actual size.
For home printing, the usual trouble spots are scaling, fuzzy files, and white edges after cutting.
For full decks, cubes, or repeat orders, a print workflow built around decklists and consistent card stock is usually the easiest path.
Richard Garfield’s earliest playtest cards had pictures on them. That detail still matters. Wizards has talked about how much art changes the feel of a card, and that is exactly why a good proxy feels better than a text-only placeholder. If you are figuring out how to make proxy MTG cards, the real goal is not just “make something printable.” The real goal is to make something readable, consistent in sleeves, and pleasant to use in actual games.
And that means treating proxy creation like a small print project. You need the right size. You need enough bleed so tiny cut drift does not create white slivers. You need a safe zone so rules text and mana symbols do not get clipped. And you need a workflow that matches what you are actually doing, whether that is a same-night Commander test, a full cube refresh, or a polished custom deck order through PrintMTG.
What A Good Proxy MTG Card Actually Needs To Do
A good proxy card does four jobs. First, it has to be easy to read at the table. Second, it has to be cut to the right size. Third, it has to shuffle and sleeve consistently. Fourth, it should be clearly identifiable as a proxy so you do not create table confusion. PrintMTG’s own proxy guide frames the goal pretty well: readable, consistent in sleeves, and durable enough for real shuffling.
Here is the simple decision table I would use:
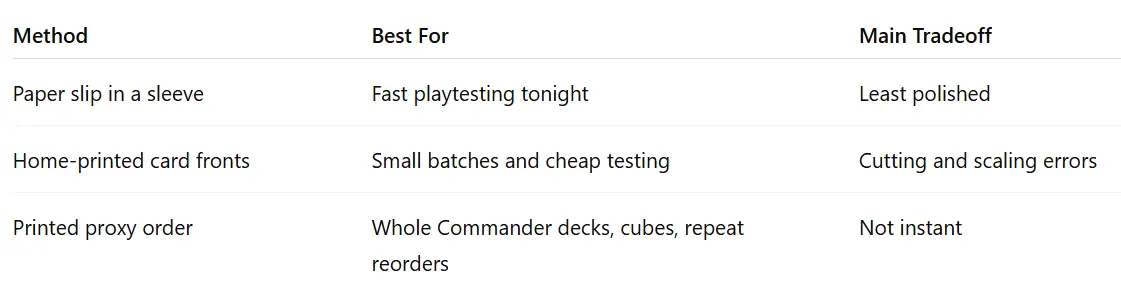
That table is the part a lot of people skip. They jump straight to artwork, then get annoyed when the cards feel bad in hand. But in practice, the workflow choice is the first real decision.
Step 1: Pick The Right Workflow Before You Build Anything
If you only need to test a few cards, the fastest method is still the humble sleeve insert. Print the front, cut it roughly, put it in front of a backing card, and play. It is not glamorous, but it works.
If you want something cleaner, you can print full card fronts at home and trim them properly. That is where card size, bleed, and file setup start to matter. And if you are building an entire Commander deck or a larger batch, PrintMTG already gives you a few cleaner entry points: print from a decklist, start from a precon, design custom cards, or browse set printings. That kind of workflow matters because it removes a lot of the boring failure points before they happen.
This is also where a lot of players save themselves time. If your real job is “I want 100 sleeves-ready cards for a deck,” then a decklist-based print workflow is usually smarter than managing a pile of one-off image files by hand. If your real job is “I want a custom frame and my own art on a few cards,” then the card maker route makes more sense. PrintMTG’s card maker supports editable frames, live preview, art repositioning, and custom uploads, which is exactly the kind of control you want for one-off or themed builds.
Step 2: Use The Correct MTG Card Size, Bleed, and Safe Zone
This is the part that fixes more problems than any printer upgrade.
The finished trim size for an MTG-sized card is 2.5" x 3.5". If you add standard bleed of 1/8" on each side, your working file becomes 2.75" x 3.75". And the safe zone rule is simple: keep important text and symbols at least 1/8" inside the trim line. PrintMTG’s own print spec cheat sheet says the same thing, and it also gives the pixel math people usually need: 750 x 1050 px at trim size for 300 PPI, and 825 x 1125 px if you include bleed.
If you remember one thing, remember this: your background art should extend into the bleed area, but your rules text should stay inside the safe zone. Do not let those two jobs blur together. Backgrounds can get sacrificed at the cutter. Text cannot.
And yes, white edges are usually geometry, not bad luck. PrintMTG’s white-edge guide is very blunt about it: no bleed, bad scaling, and imperfect cutting are the main culprits. If your art stops exactly at the trim line, the cutter only needs the tiniest drift to reveal a skinny white sliver.
Step 3: Make The Card Readable Before You Worry About Fancy Style
A lot of proxies look good on a monitor and bad at the table. That happens because screen-pretty is not the same thing as play-pretty.
The important stuff is boring. Strong contrast in the text box. Mana symbols that stay sharp. A type line people can read without lifting the card to their face. Art that supports the card instead of fighting it. PrintMTG’s design guidance leans hard into readability for exactly this reason, and the card maker itself recommends filling artwork to the safe zone so nothing important gets cut off.
This is also where I would make the card obviously a proxy. Not with a giant ugly stamp unless that is your thing, but with a custom back, a small proxy marker, or a visual treatment that makes the deck unambiguous. That keeps games cleaner and avoids awkward table confusion. PrintMTG’s own design notes recommend the same general idea: use a custom back or a small marker and keep the style consistent within the deck.
If you are using custom art, start with the sharpest source you can get. Wizards has written about how much pictures change perception, and that tracks with actual play. A good image makes the card easier to process, easier to remember, and honestly just more fun to sleeve up.
Step 4: Export The File In A Format That Preserves Sharpness
The short version is simple.
If you are printing a whole sheet or a whole deck layout, PDF is usually the best choice. If you are exporting single cards, PNG is excellent. JPG can work, but it is usually the format that softens text edges and adds compression artifacts if you are not careful. That is PrintMTG’s conclusion, and it matches normal print logic too. PDF holds layout and sizing together well, while PNG stays clean for single raster images.
On resolution, 300 PPI at final card size is the practical baseline. For MTG card size, that means 750 x 1050 px at trim. Going to 600 PPI only helps if your source art is truly high resolution and your workflow preserves that detail. Upscaling a weak file does not magically make it sharp. PrintMTG’s 300 vs 600 guide says this directly: if the text is fuzzy, the problem is usually source quality or scaling, not the fact that you did not pick 600.
So here is the simplest export advice:
Whole deck or print sheet: PDF
Single-card asset: PNG
Minimum target: 300 PPI at final size
Only chase 600 PPI if your source actually deserves it
That is enough for most people. No need to become a prepress monk.
Step 5: Print At Actual Size and Cut Like You Mean It
This is where a lot of decent files die.
If you print at 97%, “fit to page,” or “shrink to printable area,” you can create borders that were never in your design. PrintMTG’s print-spec and white-edge articles both hammer this point: print at 100%, actual size, with scaling turned off.
Then do one plain-paper test first. Not the whole deck. One sheet. Cut one card. Sleeve it. Read it from normal table distance. Check the size against a real card. If it is off, fix that before you waste ink and cardstock on ninety-nine more mistakes. PrintMTG recommends essentially the same sanity-check process.
For cutting, consistency matters more than heroics. A sharp trimmer with a firm guide will beat freehand scissors every time. White edges that vary from card to card are usually a cutting problem, not a file problem. And thin borders near the edge are a snitch. They expose every tiny drift. Full-bleed designs are usually more forgiving.
Step 6: Know When Home Printing Is Enough and When It Is Not
Home printing is great for quick tests, tiny batches, and same-night brewing. If you want to test three cards in a Commander list before Friday, home printing is fine. Do not overcomplicate it.
But if you want a whole deck, a proxy cube, or a batch you can reorder later and keep consistent, that is where a structured print workflow starts making more sense. PrintMTG’s proxy page says you can upload a list, choose versions, and print on demand with no minimums. It also lays out the material side pretty clearly: premium black-core cardstock, protective coating, precision cutting, and consistent sizing. Their print process page adds that the goal is clean edges, uniform cornering, and cards that shuffle smoothly in sleeves.
If timing matters, PrintMTG currently says most orders are produced in about 2 business days, with faster UPS options available, and the site also points to free shipping over $75. That is useful if you are deciding between “I need something now” and “I want this to feel good for months.”
Common Mistakes That Make Proxy MTG Cards Look Bad
These are the repeat offenders:
starting with low-resolution art and hoping export settings will save it
building at trim size with no bleed
putting rules text too close to the edge
exporting to mushy JPGs
printing with “fit to page” turned on
using hairline borders near the trim
skipping the one-sheet test print
cutting by eye and calling it “close enough”
Most ugly proxies are not ruined by one giant mistake. They are ruined by three small ones stacked together.
The Easiest PrintMTG Workflow for Most Players
If you want the least drama, this is the route I would recommend.
For a deck you already know, paste the list into PrintMTG, choose your versions, and order from there. That is the cleanest option for Commander decks, cube updates, and bigger batches. If you want custom frames or custom art, build the card in the PrintMTG card maker first, check the preview, and then order prints once the design actually looks right in card form. PrintMTG’s own tools are built around those two lanes for a reason.
That is really the answer to how to make proxy MTG cards without turning it into a weird side hobby. Use the right size. Use bleed. Keep the text readable. Print at actual size. Test one card before you commit. And if you are doing a real batch, use a workflow that was built for decks, not a folder full of random exports.
FAQs
What Size Should Proxy MTG Cards Be?
Use a final trim size of 2.5" x 3.5". If you are designing a print-ready file with bleed, build at 2.75" x 3.75".
Is 300 DPI Enough for Proxy MTG Cards?
Yes, 300 PPI at final card size is the normal baseline. For a full MTG card, that is 750 x 1050 px at trim size.
Should I Use PDF, PNG, or JPG?
Use PDF for full sheets and deck layouts. Use PNG for single-card exports. Use JPG only if you have to, and be careful with compression.
How Do I Stop White Edges on Home-Printed Proxies?
Use 1/8" bleed on each side, print at 100% actual size, and cut with a proper guide instead of eyeballing it.
What Is the Easiest Way To Make a Whole Commander Proxy Deck?
For most people, it is easier to start from a decklist-based workflow than to manage each card as a separate home-print file. PrintMTG’s proxy tools are built around that exact use case.
Related PrintMTG Resources
MTG Card Size, Bleed, and Safe Zone: The Print Spec Cheat Sheet